
Scribing Fitted Furniture to Uneven Walls: What It Is, Why It Matters, and How It's Done
The skill that makes bespoke fitted furniture look as though it was always part of your home
What Is Scribing — and Why Does It Matter?
If you have ever pushed a freestanding unit against a wall in an older property and noticed the gap between the back of the furniture and the wall surface — that gap is the problem scribing solves.
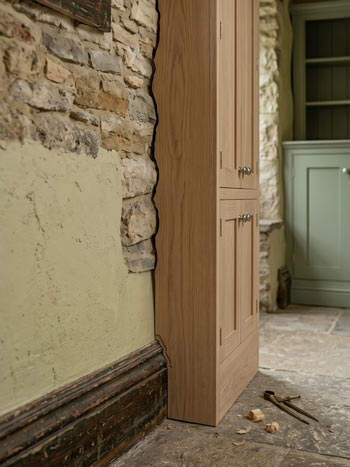
Scribing is the process of cutting the edge of a furniture panel to precisely match the profile of the surface it will sit against — whether that is an uneven plaster wall, an irregular stone surface, a sloping floor, or a detailed period skirting board. The result is furniture that sits flush against the wall at every point, with no visible gap, no filler, and no compromise.
It is one of the most important skills in bespoke joinery, and one of the clearest things that separates a properly made fitted piece from flat-pack furniture placed against a wall and left with whatever gap exists. At Built In Solutions, we scribe every piece of fitted furniture we make to the surfaces it will meet — as standard, on every installation, in every property.
The Reality of UK Housing Stock
The vast majority of UK homes — particularly Victorian, Edwardian, and 1930s properties, and older rural buildings in stone or brick — have walls, floors, and ceilings that are not flat, not plumb, and not perfectly square.
Walls bow and lean. Floors slope, sometimes by several centimetres across the width of a room. Alcoves that appear symmetrical are almost never identical in depth or width. Ceiling heights vary even across the span of a single fitted unit. In older properties, the plaster itself may have settled unevenly over decades, creating a surface that changes profile at different heights.
What Happens Without Scribing
Off-the-shelf furniture is built to standard dimensions and placed against the wall. Whatever gap exists is simply accepted. In a new-build with flat dry-lined walls this gap is rarely more than a few millimetres. In a Victorian terrace, a 1930s semi, or a rural stone property, the gap can be a centimetre or more — and it shows.
Filler is sometimes used to disguise the gap, but filler cracks as the house moves and settles, and the problem returns. The only proper solution is scribing — cutting the furniture panel to follow the exact profile of the wall so there is no gap to fill in the first place.
Scribing eliminates the gap entirely rather than disguising it.
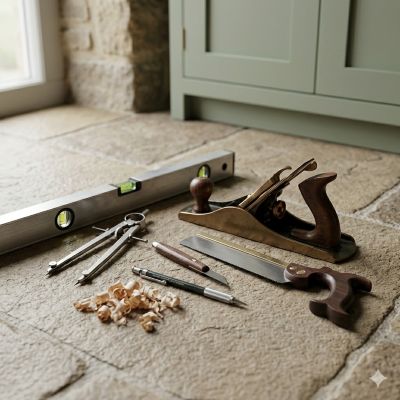
The tools of scribing — spirit level, scribing compass, hand plane, tenon saw, marking knife, and pencil.
What You Need for Scribing
Scribing Compass
A two-legged scribing tool — one leg follows the wall surface, the other transfers its exact profile onto the panel.
Pencil or Marking Knife
For marking the scribed line clearly onto the panel before cutting.
Jigsaw or Hand Saw
For the rough cut — removing the bulk of the material along the scribed line.
Hand Plane or Block Plane
For refining the edge pass by pass, removing small amounts of material until the fit is exact.
Spirit Level
For levelling the unit precisely before scribing begins — the scribed cut is made relative to the unit's position.
Patience
Good scribing cannot be rushed. On a very irregular surface, three or four passes may be needed before the fit is exact.
The Scribing Process — Step by Step
The following nine steps describe the scribing process as we carry it out on every installation. The process is the same whether the wall is gently bowed plasterwork or dramatically irregular exposed stone.
1
Survey and Measure the Surfaces
Before any furniture is manufactured, we measure every surface the unit will touch — wall, floor, and ceiling — at multiple points across its width and height. This tells us the full extent of the unevenness and how much oversizing the panel needs to allow for scribing. A wall that varies by 15mm across its height needs 15mm of scribe allowance built into the panel before we start.
2
Manufacture with Scribe Allowance
The furniture is built in the workshop slightly oversized on every edge that will meet a wall, floor, or ceiling. This extra material — the scribe allowance — is what will be removed during fitting to achieve the flush finish. If the panel is manufactured to the finished dimension without scribe allowance, there is nothing to work with on site.
3
Offer Up and Level the Unit
On installation day, the unit is placed in position and levelled carefully — both front to back and side to side — using a spirit level and packing pieces beneath.
It must be perfectly level before scribing begins, because the scribed cut is made relative to the unit’s position, not relative to the floor.
4
Mark the First Scribe
With the unit in position, a scribing compass is set to the widest gap between the panel edge and the wall surface.
The compass is then run along the wall surface with one leg following the wall and the other leg — holding a pencil — transferring the exact profile of the wall onto the panel. The line marked on the panel is a mirror image of the wall’s surface profile.
5
Make the First Rough Cut
The panel is removed from position and a first rough cut is made along the scribed line — removing the bulk of the material and bringing the panel edge approximately close to the required profile.
This is not the finished cut. It is a rough approximation that gets the panel close to the wall without the risk of removing too much material in one pass.
6
Offer Up and Check the Fit
The panel is returned to position and offered up against the wall. The fit at this stage will be approximate — touching at some points, with small gaps remaining at others. This is expected. The remaining gaps are assessed and the areas that need further work are identified.
7
Mark the Detailed Scribe and Refine
A second, more detailed scribe is marked — this time with the compass set to the remaining gap rather than the full gap from Step 4.
The panel is removed again and the edge is refined with a hand plane working carefully along the high points, or with a second cut on the saw following the new scribed line.
This process is repeated as many times as needed. On a very irregular surface — stone, old brick, severely bowed plasterwork — three or four passes may be required before the fit is exact.
8
Final Fit and Fixing
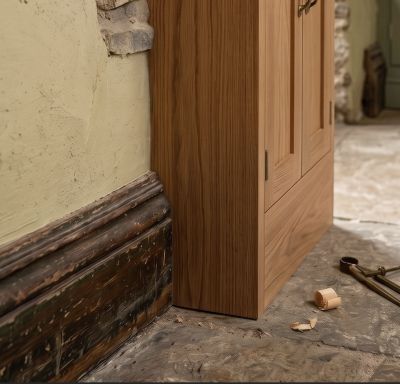
Once the panel sits flush against the wall surface at every point with no visible gap, it is ready for final fixing. The panel is secured to the wall at the designated fixing points — never bonded along its length, which would prevent removal and could damage the wall surface. The scribed edge needs no filler, no caulk to disguise gaps, and no compromise.
9
Repeat for Every Junction
Every edge of every panel that meets a wall, floor, or ceiling goes through the same process. A typical fitted unit in a period property may require scribing at the floor, at both side walls, and at the ceiling — as well as around any skirting boards, architraves, or other architectural details that the furniture needs to work around.
Scribing to Skirting Boards and Cornicing
Skirting Boards
Skirting boards in Victorian and Edwardian homes are typically 150–200mm tall with a detailed moulded profile — ogee, torus, ovolo, or a combination. The base of a fitted unit needs to either sit cleanly on top of the skirting or be cut around it so that the unit sits flush to the wall above the skirting line.
We cut around original skirting boards precisely rather than removing them. Removing original period skirting to fit furniture is something we avoid wherever possible — the skirting is part of the character of the room and replacing it with new timber, however well matched, is never quite the same. Scribing around the existing skirting preserves the original detail intact.
Cornicing
Where a fitted unit meets an existing cornice at ceiling level, the top panel is scribed to follow the profile of the cornice so the joint between furniture and ceiling is clean and tight. A cornice in a Victorian room may project 50–80mm from the wall and ceiling surface, with a curved or stepped profile that requires careful scribing to follow precisely.
Architraves and Door Frames
Where fitted furniture runs up to a door frame or window architrave, the furniture panel is scribed to sit flush against the architrave profile — again, without removing or damaging the original architectural detail of the room.
How Scribing Relates to Property Value
Properly scribed fitted furniture looks as though it belongs to the room — not as though it was installed into it. Estate agents consistently note that quality fitted furniture in period properties is a value-adding feature, and part of what makes it feel quality is precisely this: the absence of gaps, the flush fit against the wall, the sense that the furniture was always there.
Poorly fitted furniture — with gaps at the walls, filler that has cracked, or skirting boards that have been removed and replaced with new timber — tells a different story. It signals compromise rather than craftsmanship. In a period property, that compromise is visible and it matters to buyers.
The absence of gaps is part of what makes fitted furniture feel like quality — to the homeowner, and to anyone who views the property afterwards.
Scribing at Built In Solutions
We scribe every piece of fitted furniture we make to the surfaces it will meet. It is not an optional extra or an additional service — it is simply how fitted furniture should be made and installed.
Our survey process always includes measuring the unevenness of every surface the furniture will touch, and our manufacturing process always builds in scribe allowance on every relevant edge. On installation day, scribing is part of the fitting process for every unit, in every property, as standard.
If you are considering fitted furniture for a period property — a Victorian terrace, an Edwardian semi, a 1930s home, a rural stone property, or any older building where the walls, floors, and ceilings are unlikely to be perfectly flat — scribing is not something to ask about. It is something to expect.
Every Installation
We scribe every piece of fitted furniture to the surfaces it meets — walls, floors, ceilings, skirting boards, and cornicing.
Built into the Process
Scribe allowance is built into every panel at the manufacturing stage. It is never an afterthought.
Period Property Specialists
We have fitted furniture in Victorian terraces, Edwardian semis, 1930s homes, Georgian townhouses, and rural stone properties across Oxfordshire and beyond.
No Filler, No Compromise
The scribed edge needs no filler and very little caulk. The fit is exact — or we keep refining until it is.
Frequently Asked Questions About Scribing
What is scribing in joinery?
Scribing is the process of cutting the edge of a furniture panel to match the exact profile of the surface it will sit against — a wall, floor, ceiling, or architectural detail. The result is furniture that fits flush at every point with no visible gap.
Why do fitted furniture panels need scribing?
Because walls, floors, and ceilings in most UK homes — particularly older properties — are not flat or perfectly square. A straight-edged panel placed against an uneven surface will touch at one or two points and leave gaps everywhere else. Scribing removes material from the panel edge to follow the exact profile of the surface.
How many times does scribing need to be repeated?
On a mildly uneven wall, a single scribe and cut may be sufficient. On a very irregular surface — exposed stone, old brick, severely bowed plasterwork — three or four passes may be needed before the fit is exact. Each pass removes a little more material and brings the panel closer to the wall until the fit is flush at every point.
Does scribing damage the wall?
No. The scribing process involves marking and cutting the furniture panel — not the wall. The wall surface is used as a reference to mark the panel, but nothing is done to the wall itself during scribing.
Do you scribe all your fitted furniture?
Tes — every piece of fitted furniture we make is scribed to the surfaces it will meet, as standard. It is part of our installation process on every project, in every property.
Can filler be used instead of scribing?
Filler can disguise a gap temporarily but it is not a permanent solution. As a house moves and settles, filler cracks and the gap reappears. Scribing eliminates the gap entirely rather than disguising it.
Do you remove skirting boards to fit furniture?
Wherever possible, no. We scribe around existing skirting boards rather than removing them, preserving the original period detail of the room. Removing and replacing original skirting — even with well-matched new timber — changes the character of a period room in a way that is difficult to undo.
See Our Work
Fitted Living Room Furniture
Alcove cupboards, cabinets, and storage — all scribed to the exact dimensions of your room.
Fitted Wardrobes
Floor-to-ceiling bespoke wardrobes fitted flush to your walls, floor, and ceiling.
Alcove Cupboards
Period alcove cupboards scribed to sit perfectly within your chimney breast recess.
Fitted Home Office
Bespoke desks and shelving fitted precisely to your room — however irregular the walls.